SwiftUI: Apply Custom Formatting to Localized Strings


In today's post, I am going to touch on a niche area in SwiftUI designs and string formatting. This is about how to apply custom formatting to localizable strings. It sounds complicated, so let me explain it with an example,
Suppose I have a localizable string like this,
Going from %1$@ to %2$@. Have a happy journey passing via %3$@. Bon Voyage
Please note that this strings is likely to be translated in many languages where positional parameters might get tossed around in unpredictable manner. For example, in some languages station names might appear before "Going from" phrase or the station name that represents passing via argument may appear in the middle instead of at the end like this sentence in English.
The problem statement is, in the above example, we want to apply special formatting only to arguments. For example, station names must appear in bold form with red color in the background and white in the foreground.
One option is to extract arguments by start and end index and selectively apply styles to them. However, this approach won't work for apps supporting localization.
We are going to achieve this by recognizing literal arguments and applying selective formatting to them. Let's see how!
- We will use the input string which contains regular text and arguments that need formatting. We will sequence arguments in the format
%i$@whereirepresents their position in the sequence and it starts with 1. For example,Going from %1$@ to %2$@. Have a happy journey passing via %3$@. Bon Voyage - We will create a function that will take the input string and sequence of passed arguments replacing placeholder symbols (e.g.
%1$@) - We will create another utility function which will take these parameters and return the array of
FragmentType. Each fragment type represents either a literal or string - We will go over an array of
FragmentTypeand apply styles to arguments (Or literals if that is the requirement) - We will combine the array of
Textobjects from the previous step into a singleTextobjects and display them on theSwiftUI view
First, we will define an enum to store fragments and literal from the input string
enum FragmentType {
    case literal(String)
    case argument(Int)
}
Next, we will write functions that take an input string and convert it into an array of FragmentType enums for later formatting.
    static func fragmentizeFormattedString(_ formatString: String) -> [FragmentType] {
        return getFragments(regex: "%\\d+\\$@", inputText: formatString)
    }

    static func getFragments(regex: String, inputText: String) -> [FragmentType] {

        var fragments: [FragmentType] = []

        guard let regex = try? NSRegularExpression(pattern: regex) else {
            return []
        }
        let results = regex.matches(in: inputText,
                                range: NSRange(inputText.startIndex..., in: inputText))

        var previousIndex = inputText.startIndex

        var currentIndex = 0
        for match in results {
            for range in 0..<match.numberOfRanges {
                let rangeBounds = match.range(at: range)

                guard let range = Range(rangeBounds, in: inputText) else {
                    continue
                }

                if range.lowerBound != inputText.startIndex {
                    let closedRange = previousIndex..<range.lowerBound
                    fragments.append(.literal(String(inputText[closedRange])))
                }
                fragments.append(.argument(currentIndex))
                previousIndex = range.upperBound
                currentIndex += 1
            }
        }

        if previousIndex < inputText.endIndex {
            fragments.append(.literal(String(inputText[previousIndex..<inputText.endIndex])))
        }

        return fragments
    }
There is a lot going on in the previous function. It accepts an input string along with a regular expression to extract arguments of type %1$@ from it. This is dictated by the regular expression. As it moves along, it breaks the original string into literal (non-arguments) and arguments. Literals are converted into literal case with text as an argument and arguments into argument case with argument index as an argument.
In the next part, we will see how to use these fragments for formatting specific parts of the string and presenting them on the SwiftUI view.
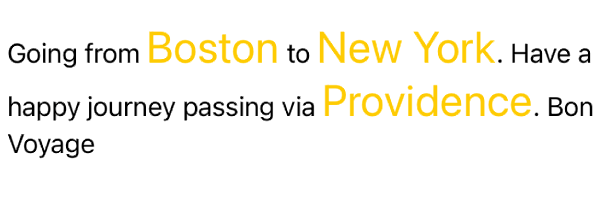
struct CustomStringFormat_Example: View {

    let inputString = "Going from %1$@ to %2$@. Have a happy journey passing via %3$@. Bon Voyage"

    let arguments = ["Boston", "New York", "Providence"]

    var body: some View {
        VStack {
            let fragments = fragmentizeFormattedString(inputString)

            let output = fragments.map { fragment in
                switch fragment {
                case .literal(let staticText):
                    return Text(staticText).foregroundColor(Color.red).font(.largeTitle)
                case .argument(let index):
                    return Text(arguments[index]).foregroundColor(Color.yellow).font(.title)
                }
            }.reduce(Text(verbatim: ""), +)

            output
        }
    }
}
In the code above, we simply iterated over a list of output fragments and applied formatting one by one. Let's take a look at examples,

If you want to keep literal styles unchanged, you can also skip formatting on them.
case .literal(let staticText):
    return Text(staticText)
Localization
You might have noticed that I talked a lot about localization in this post. The reason for using formatted strings with arbitrary arguments is to facilitate the localization process. For example, if the arguments are embedded into the string with no distinction between literals and arguments, it can easily lose context and produce a garbled translation.
Referring to the above example, each language will have its own rules to position station names within the input string. Since we're passing them by arguments and the context of the string, translators can better place them to match the target languages' rules.
For example, consider the following line in the Localization file,
//A informational string where first two arguments indicate final source and destination stations. The last argument indicates the station through which the train will be passing

 "Going from %1$@ to %2$@. Have a happy journey passing via %3$@. Bon Voyage" = "Going from %1$@ to %2$@. Have a happy journey passing via %3$@. Bon Voyage";
Now, when the translator looks at the comment and the original English string, they know the context of this message, not just by looking at the raw string, but also the situation where these arguments are used in the user-facing message.
So final translations in some other languages will look like this,
// French
//A informational string where first two arguments indicate final source and destination stations. The last argument indicates the station through which the train will be passing

"Going from %1$@ to %2$@. Have a happy journey passing via %3$@. Bon Voyage" = "Passer de %1$@ à %2$@. Bon voyage en passant via %3$@. bon voyage";

//Spanish
//A informational string where first two arguments indicate final source and destination stations. The last argument indicates the station through which the train will be passing

"Going from %1$@ to %2$@. Have a happy journey passing via %3$@. Bon Voyage" = "Pasando de %1$@ a %2$@. Que tengas un feliz viaje pasando por %3$@. buen viaje";


//Hindi
//A informational string where first two arguments indicate final source and destination stations. The last argument indicates the station through which the train will be passing

"Going from %1$@ to %2$@. Have a happy journey passing via %3$@. Bon Voyage" = "%1$@ से %2$@ तक जा रहा हूँ। %3$@ से होकर गुजरने वाली आपकी यात्रा मंगलमय हो। बॉन यात्रा";
As evident from these translations, the absolute position of arguments changes by language, so relying on the arguments rather than their absolute position in English is the right way to apply translations and argument-wise formatting
Source Code
The full source code for this tutorial is available on GitHub Custom String Format Repo for further reference
Summary
So this was all about how to apply custom styles to localizable strings in SwiftUI. As more and more apps become available worldwide, localization is a requirement and not an option for any modern app. The solution mentioned in this post works well for any range of strings translated into any language.
Have you faced a similar issue in your production app before? How was your experience and how did you solve it? Does the solution mentioned here fit your use case? If not, what changes do you suggest to make it more robust and flexible? I would love to hear your thoughts.
Support and Feedback
If you have any comments or questions, please feel free to reach out to me on LinkedIn.
If you like my blog content and wish to keep me going, please consider donating on Buy Me a Coffee or Patreon. Help, in any form or amount, is highly appreciated and it's a big motivation to keep writing more articles like this.
Consulting Services
I also provide a few consulting services on Topmate.io, and you can reach out to me there too. These services include,

