iOS 3D Touch - Quick Actions (Part 1)

I wrote a Blog post about iPhone 3D touch demo long time ago. However, that post was just a show off and did not put forward any real sample code. Today, I am going to show you step by step how you can write a code to implement 3D touch in your app.
This is the first part of the series of 3 posts on how to use 3D force touch on an iOS. Posts are as follows
- Quick actions
- Peek and pop actions
- Measuring the force of touch
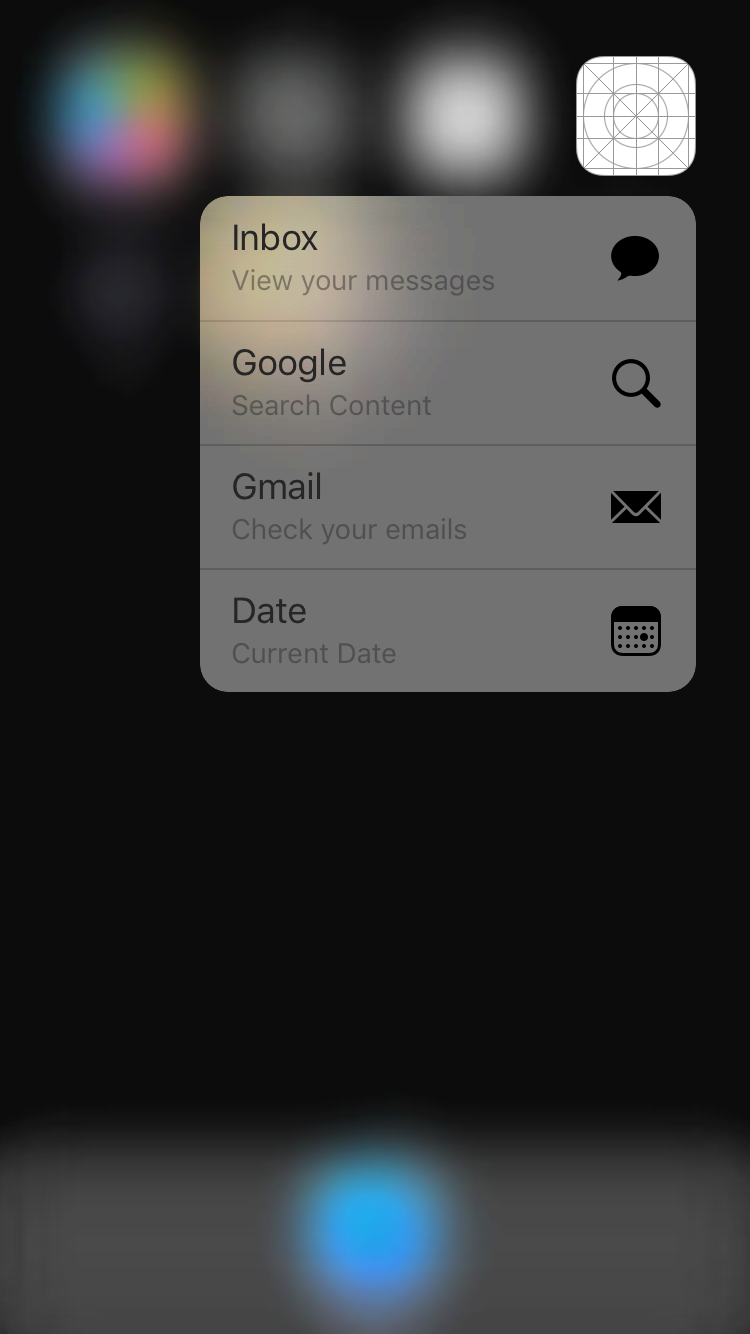
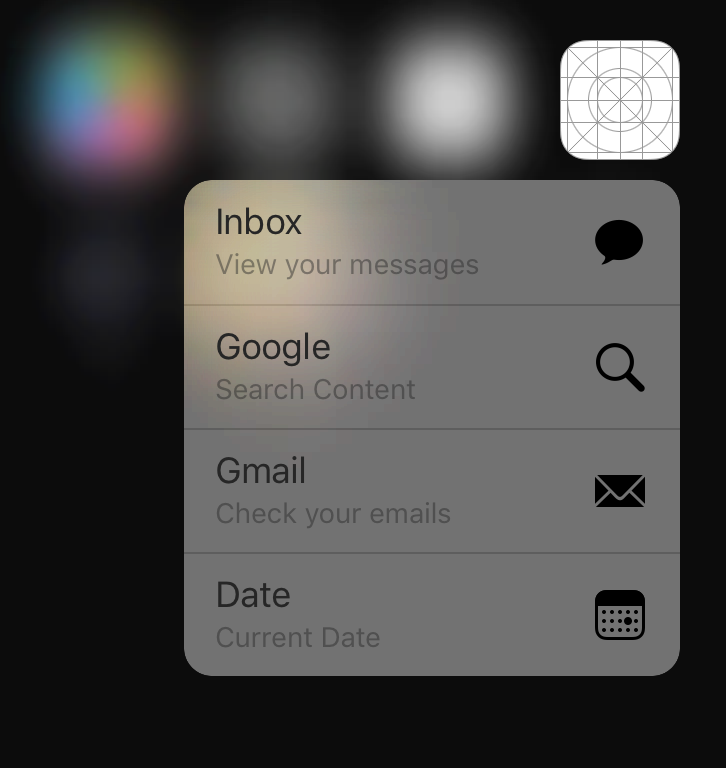
To begin with, here's the screenshot of final and finished 3D touch demo of quick action items
- Adding static quick launch home icons
This feature allows you to have predefined list of options that can be launched by applying force touch to an icon on the home page. As name suggests, these options could be configured on the compile time and they remain fixed on runtime. These options could be configured in the appplistfile.
They could also be configured in the
UIAppDelegate, but it makes more sense to customize them in theplistfile since they are static.
Here's how you can construct it. I will give an elaborate example for first shortcut item.
For any item, you will have to add the following code to plist in the given format.
<key>UIApplicationShortcutItems</key>
<array>
		<dict>
			<key>UIApplicationShortcutItemIconType</key>
			<string>UIApplicationShortcutIconTypeMessage</string>
			<key>UIApplicationShortcutItemSubtitle</key>
			<string>View your messages</string>
			<key>UIApplicationShortcutItemTitle</key>
			<string>Inbox</string>
			<key>UIApplicationShortcutItemType</key>
			<string>$(PRODUCT_BUNDLE_IDENTIFIER).AppMessaging</string>
			<key>UIApplicationShortcutItemUserInfo</key>
			<dict>
				<key>MessageIdentifier</key>
				<string>300</string>
			</dict>
		</dict>
</array>
Your plist will look similar to this,
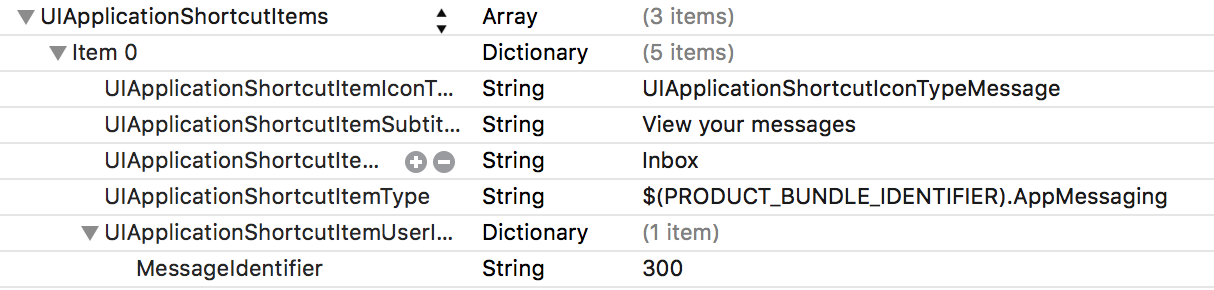
Let's go over the keys one by one,
UIApplicationShortcutItemIconType- This specifies the type of icon you want to use for a shortcut item. There are several system provided icon types. In case you want to use your custom image as an icon (Please be aware that icons you are going to use will be converted to color space used by iOS to represent the home page shortcut icons). If you wish to use the custom image file as an icon, you will have to include keyUIApplicationShortcutItemIconFilealong with value as a name of image file in the plist as follows.
<array>
    <dict>
        <key>UIApplicationShortcutIconFile</key>
        <string>my_custom_icon</string>
    </dict>
</array>
UIApplicationShortcutItemTitle- Title of shortcut item as it appears beside it when app icon is force touched.
-
UIApplicationShortcutItemSubtitle- Title of shortcut item as it appears beside it when app icon is force touched. -
UIApplicationShortcutItemType- A unique type string to distinguish the given shortcut item from other items based on the identifier attached to it. Usually this follows the pattern$(PRODUCT_BUNDLE_IDENTIFIER).<unique_shortcut_item_identifier>.
You can use this identifier in your code to check which shortcut has been selected as follows. This is done in the following AppDelegate method as follows,
func application(application: UIApplication, performActionForShortcutItem shortcutItem: UIApplicationShortcutItem, completionHandler: (Bool) -> Void) {
    completionHandler(handleShortcut(shortcutItem))
    }

private func handleShortcut(shortcutItem: UIApplicationShortcutItem) -> Bool {
    let shortcutType = shortcutItem.type
    guard let shortShortcutItemString = shortcutType.componentsSeparatedByString(".").last else {
        return false
    }
    print("Selected icon identifier is \(shortcutType)")
    return true
}
UIApplicationShortcutItemUserInfo- This is a dictionary which encapsulates all theuserInfodata. This will be used store any arbitrary information you want to pass to app. This too can be handled as mentioned in earlier point.func application(application: UIApplication, performActionForShortcutItem shortcutItem: UIApplicationShortcutItem, completionHandler: (Bool) -> Void) { print("User info is \(shortcutItem.userInfo)")
}
2.. Adding Dynamic quick launch actions
We looked at one way to add icons as shortcut items with 3D touch. Now we will see how to add dynamic shortcut items on the home page. This is useful when you want to present different options
As an example, I have directly added an extra item in my UIApplication's didFinishLaunchingWithOptions method as below.
func application(application: UIApplication, didFinishLaunchingWithOptions launchOptions: [NSObject: AnyObject]?) -> Bool {
    add3DTouchShortcutItems()
}

func add3DTouchShortcutItems() {
    var updatedShortcutItems = UIApplication.sharedApplication().shortcutItems
    let additionalShortcut = UIApplicationShortcutItem(type: "com.jayeshKawli.JK3DTouchDemo.CurrentDate", localizedTitle: "Date", localizedSubtitle: "Current Date", icon: UIApplicationShortcutIcon(type: UIApplicationShortcutIconType.Date), userInfo: ["DateFormatter": "MM/dd/yyyy"])
    let newShortcutItems = [additionalShortcut]
    updatedShortcutItems?.appendContentsOf (newShortcutItems)
    UIApplication.sharedApplication().shortcutItems = updatedShortcutItems
}
3.. Handling selection of shortcut items
This is slightly complicated than previous code sample. In this case you have to call couple of delegate methods and one of those also deals with closures.
Below is the full code right from the point when delegate method is called upon shortcut item selection to the point where we present the appropriate UIViewController
func application(application: UIApplication, performActionForShortcutItem shortcutItem: UIApplicationShortcutItem, completionHandler: (Bool) -> Void) {
    shortcutItem.userInfo
    completionHandler(handleShortcut(shortcutItem))
}

private func handleShortcut(shortcutItem: UIApplicationShortcutItem) -> Bool {
    let shortcutType = shortcutItem.type
    guard let shortcutEnumType = ShortcutIconIdentifier(longShortcutString: shortcutType) else {
        return false
    }
    launchViewControllerBasedOnShortcutType (shortcutEnumType)
    return true
}

func launchViewControllerBasedOnShortcutType (shortCutType: ShortcutIconIdentifier) {
    var navControllerTitle: String = ""
    var destinationURLString: String = ""
    switch shortCutType {
        case .AppMessaging:
            destinationURLString =  "https://www.whatsapp.com/"
            navControllerTitle = "Application Messaging"
        case .GoogleSearch:
            destinationURLString = "https://www.google.com/"
            navControllerTitle = "Google Search"
        case .Gmail:
            destinationURLString = "https://www.gmail.com/"
            navControllerTitle = "Gmail"
        case .CurrentDate:
            destinationURLString = "https://www.timeanddate.com/"
            navControllerTitle = "Current Date"
    }

    if let presentedViewController = self.window?.rootViewController?.presentedViewController {
        presentedViewController.dismissViewControllerAnimated(true, completion: nil)
    }

    if let url = NSURL(string: destinationURLString) {
        let vc = JKWebViewController(url: url)
        let nav = UINavigationController(rootViewController: vc)
        vc.title = navControllerTitle
        self.window?.frame = UIScreen.mainScreen().bounds
        self.window?.makeKeyAndVisible()
        self.window?.rootViewController?.presentViewController (nav, animated: true, completion: nil)
    }
}
As you can see from example above we are using individual icon identifier to distinguish between the option selected.
Please note two important items. You can add any custom image as an shortcut icon file. However, make sure it is single color template file. Otherwise it is going to get all ruined when it is displayed on the viewport. Second, you can only show 4 items at a time. That being said if you try to add more than 4 items, iOS will show only first 4 options.
Note: The full project for 3D touch demo is Available on Github

