Using Charles Proxy for Debugging Network Requests

TIL to how to use Charles proxy on browser and mobile device. Earlier when I wanted to debug network requests on these two platforms, Charles proxy would not catch them because of lack of configuration and my laziness to do appropriate settings.
However, as they say you need enough motivation to drive you towards your goal. I got that motivation at 2:00 this morning and continued through it till 3 until setting was in place and everything was working as expected. So I thought I might write about my experience to help others as well.
Debugging network requests in iOS simulator
Debugging network requests through iOS simulator using Charles proxy is easy though. All you have to do is follow the steps below,
- Open Charles proxy
- Go to
Proxy -> SSL Proxying Settings - Under SSL Proxying add the base URL you want to debug network requests for, press OK and exit
- Now you also need to install SSL Proxying certificate in your simulator
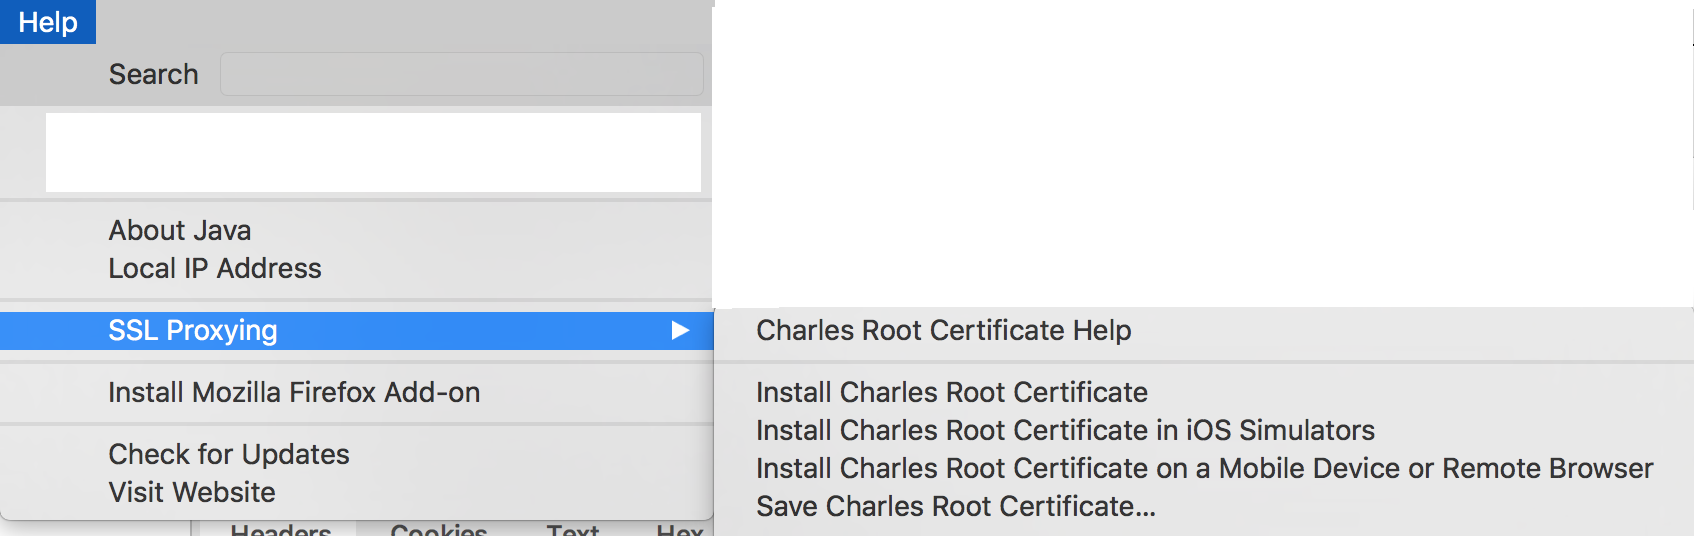
- This can be done by going to
Help -> SSL Proxying -> Install Charles Root certificate in iOS simulators - Please note that Charles proxy will only install root certificate in the currently open simulator version. If you want to install it in some other simulator version, you will have to open that simulator and install the certificate again
- When this is done restart both Charles proxy and simulator since this effect won't take place until restart is performed on both front
When this is done, run the app in simulator and you will see it start capturing outgoing network requests
Debugging network requests in browser
This was bit tricky in the beginning, it took me full 6 months before I realized how it could be done. But it's not difficult at all.
- Open Charles proxy
- Go to
Help -> SSL Proxyingand selectInstall Charles Root certificate on a mobile device or remote browser
- This will show you a dialogue below
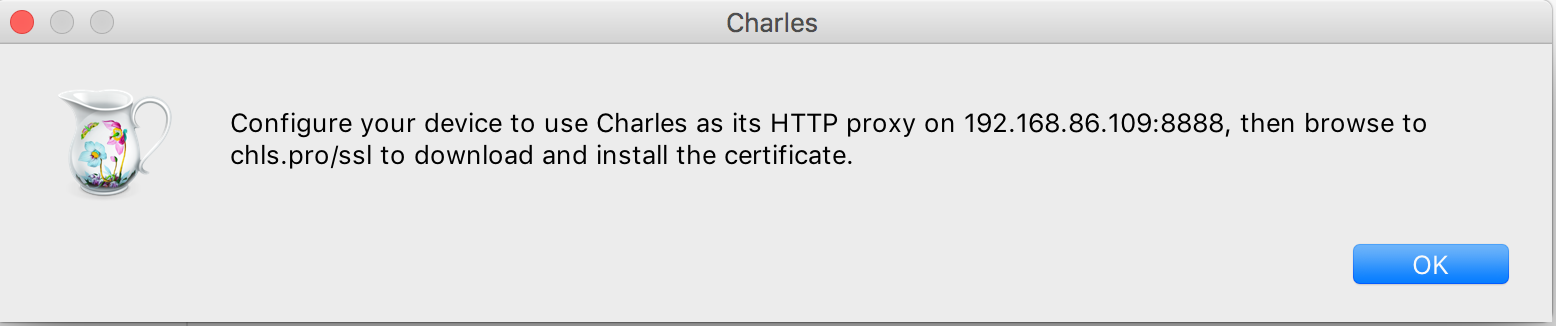
-
This indicates exactly what we need to do. First we will add proxy and then install Charles root certificate from the indicated address
-
First proxy settings. Go to
System Preferences -> Network -> Wifi -> Advanced -> Proxies -
Select an options
Web Proxy (HTTP)and under Web Proxy Server on right side change proxy server address to192.168.86.109and change the port to8888 -
Now go to an indicated URL
chls.pro/ssl. Download and install the certificate in your keychain -
By default certificate may not be trusted and it's initial trust level is set to
Use System Defaults. You will need to change it toAlways Trust -
Open
Keychain Access, select Certificates and search for Charles proxy certificate named asCharles Proxy CA -
Right click the certificate and select an option
Get Info -
You will see an option
When using this certificate, change its value toAlways Trust -
When you exit this dialogue, it will ask you for admin password. Enter the password, save your changes and exit
-
Now restart the Charles proxy and reload the page. You should be able to see your outgoing network requests as long as the URL path is added under
SSL ProxyinginSSL Proxying Settings
Debugging network requests in mobile device
Before proceeding, please make sure your Mac and Phone are on the same network. If everything goes right, you will see the prompt asking if network requests should be allowed through the specified proxy. If both devices are using Wi-fi, then Charles proxy will not be able to detect network requests going through the device.
Note how you can do it directly through the simulator. Simulator, being part of OS is using the same network so you no longer need to manually set this up while using browser or simulator
-
Adding configuration on mobile device to debug outgoing network requests it similar to what we did for browsers
-
Open Settings on iPhone device
- Go to Wifi
- Select current Wifi network
- Scroll all way to the bottom to section HTTP Proxy
- As instructed earlier by Charles proxy dialogue put the value
192.168.86.109underServersection - Put value
8888under Port section
-
Open Safari and go to address
chls.pro/ssl. This will automatically install and trust the Charles root certificate. You can verify it by going toSettings -> General -> Profiles and Device Management -
There you will see the
Charles Proxy CAalong with other certificates on your device if applicable -
If for some reason certificate is not trusted, you can select certificate from the list and select an option
Trust Certificateto manually trust it -
Now add the URL you want to debug network requests for under
SSL proxying settingsand restart the Charles Proxy app -
Once this is done, you should be able to capture and debug all inbound and outbound network requests on the device
Hope this helps to anyone who is using Charles Proxy to debug network requests in the app. Feel free to shoot an email or hit me up on the Twitter if you have further questions on configuring and using Charles Proxy

